

Team Killer Instinct – Boston Whaler Outrage 17
Written by: Nate Carlson
I’ve been asked a few times lately to do a couple write ups about some of the work I’ve done to my 17′ Boston Whaler Outrage to get it ready to fish for saltwater bass. Disclaimer… I am no engineer or will say that my work was done perfectly or that it was the best way to do it. I will admit though that all the work I’ve done is solid and works very well. My hopes are that you take all of my trial and errors and improve on it!
So… This is how the Trolling Motor (TM) install it went down…
My Outrage 17 Boston Whaler gave me some hurdles to jump to prep it for some Tournament Bass Fishing. (Note.. IT IS A KILLER SALT WATER BASS BOAT! Very happy with it! Dry, fast, safe… I am very happy!)
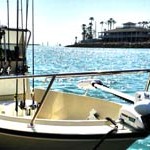
Most notable while trying to install a Trolling motor on the bow would be the Lip (See in the below Picture).

Boston Whaler Hull Lip
Somehow I needed to do two things. Get a Trolling Motor on the bow with this Lip being in the way, while keeping the rails intact and looking original. After all, it is Hull #1 of the Outrage 17 (Purchased by my father off the showroom floor LB Boat Show in 1989.
First, let’s address the lip and how I worked out the Base Bracket to hold the TM (Trolling Motor) down on the bow. Then the Rail…
First, was my decision on purchasing the Minn Kota IPilot. (Killer TM!!! Auto Pilot is like having a third angler on the boat! Worth the investment!) The functionality was not the only reason to purchase this motor, but the way it raised and lowered into the water would be best for what I needed.
My father and I spent many a day discussing how to fit the motor. Issue: The Removable “Quick Release” base creates some height off the deck, giving me clearance issues under the rails.

Minn Kota – Boston Whaler Outrage 17 Install
The evening before I was going to give up and simply cut the Rails to make it fit. We came up with an incredibly simple idea. One of those… Oh.. Duh! “..Why can’t we just cut the “Quick Release” to fit around the Lip and give us the room that we need?
Turns out that would work perfectly!

Minn Kota – Quick Release Base for Trolling Motor

Minn Kota – Cut Quick Release Base for Trolling Motor
Then comes the design of the piece all together. What had to be considered in this process? Strength!! The TM will take some abuse up there and I didn’t want it to fall off while crossing from San Clemente Island to Catalina for example… So it needs to be bolted on well!
I decided to use Aluminum, Starboard, Stainless Steel Screws, Six10 Epoxy and a bunch of 5200!
I purchased a ¼ inch piece of Aluminum from McMaster-Carr her in Santa Fe Springs, CA. The great thing about Aluminum is that it can be cut and shaped like a piece of wood as it is a reasonably soft metal. I used saws, Drill bits and countersink, miter, Taps and Sandpaper to fabricate my plate.
I found where I wanted the TM to be placed. Measured, taped, measured again, etc.. decided on the shape I wanted and most importantly… the best location in order to ensure I had something to bolt into under the fiberglass deck! Made my cardboard template and started in on my Aluminum Bracket. Matched the Shape on a ¼ inch piece of Starboard. Holes drilled with a countersink to keep it flush to the TM. The pictures below give you a pretty good idea of what work I did to get the finished product.

Tapped hole in Trolling Motor Aluminum Base

Trolling Motor Starboard Base holes drilled to fit Quick Release Bracket
Boston Whalers “The Unsinkable Boat” have a Foam Filled Hull. Creating an issue while trying to anchor the TM Base to the boat. For a good hold, you should have something behind the ¾ inch thick Plywood deck. (Note: Must be Stainless (IMPORTANT!)) Anchors like the ones used to go through drywall have been used to do this before. Not much room for that here for me. So… the Alternative and also the way to fix loose Rails BTW!

Custom Trolling Motor mount for Boston Whaler Outrage 17

Trolling Motor Custom Finished Bracket for Boston Whaler Outrage 17

Six10 Epoxy used to Anchor down the Bracket to the Bow of the Boston Whaler
I cored out the foam just below the deck with something like an L Shaped like an Allen wrench for example. Trying to create a gap to poor the Six10 Epoxy into, so that to create my anchor behind my drill holes. I used a smaller syringe (Epoxy and Syringe Found at West Marine) to get the Epoxy into the hole evenly. (Note: Take your time to allow for it to all settle in the hole evenly!) Fill all the holes being drilled into the deck this way. Once this was dry, I drilled the holes I needed for my Stainless Steel Screws. Solid hold!!!
A generous amount of the amazing 5200 Epoxy and the Base Bracket was all installed!

Trolling Motor Bracket being installed on Boston Whaler Outrage 17
The next issue for me was trying to get a Trolling Motor on the Bow while preserving the Rails. Not only are they safe and sometimes a lifesaver when you’re up on the bow casting on a Boiler Rock, rocking and rolling. But, I did still want to keep the boats “original” appearance!
Now, I’ve got to figure out how to get the TM to somehow Raise and Lower without cutting the Rails…
Thought of many solutions to this issue.. Cut, and make the section I need gone.. removable, or on some kind of hinge that can be moved when I needed. Not only would this be just another thing I’d need to do in the process of raising and lowering the TM, I still had a problem with cutting the rail.
Turns out.. After discovering the best way to install the TM, all I needed to do was to add a few spacer’s under the rail to prop it up a bit for the clearance I needed. Works perfectly!

Riser Pad to lift Rails up enough for Trolling Motor to raise and lowerAnd…. The final Fitting!
Also a big thanks to The Trolling Motor Dr in Lakewood, CA for getting me the TM and letting me bounce ideas off them about my install.
I hope that this helps a few of us out there. It took some trial and error, but I am super happy about the final product.
Please feel free to give me some feedback or ask any questions you might have.
To come.. Battery location Decision and Install and Bait Tank.. Stay Tuned!

Trolling Motor Custom Bracket installed and fitted with Minn Kota – Boston Whaler Outrage 17

Good view of Trolling Motor Clearance on Boston Whalers Lip – Perfect fit